Tial light wire colors help you to identify any type of issue occurring in your bike. If you do not know about the tail light wire colors, then don’t worry because today, in this guide article, I will explain the rear light wire colors.
Let’s dive into:
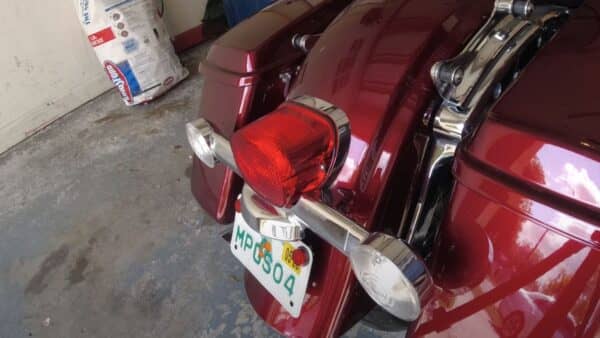
What is the Harley Davidson Tail light wire color?
If you see too closely at the tail light of your Harley Softail or Road King models, you will see that the tail light is connected to the blue wiring.
Thus you can quickly identify the primary color of the taillight if it needs a repair or replacement. Now you have no issue replacing the tail light and placing its color.
Here are the colors of your Harley Davidson Essentials lights.
| Component | Wire name |
| Taillight | Solid blue |
| Left turn signal | Purple |
| Right turn light | Brown |
| Brake | Red colour and it has a yellow stripe |
| Ground | Black |
If you need any of these wire colors, you can easily understand which colored wire you need to work with which component of your motorcycle.
If you still find it challenging to determine the color of the wires, then next in the article, we will explore how to choose the color of the wire.
How to determine the Harley Tail light color?
Determining the color of the tail light of a Harley is a straightforward process; you can also follow these steps to choose the color of other components of your bike.
Secure your bike
U-locks:
These are among the most durable bike locks, resistant to bolt cutters and offering substantial protection.
Chain locks:
While slightly more flexible than U-locks, they must be heavy and thick to provide equivalent security.
Lock up both wheels and the frame to an immovable object. If using a single U-lock, lock the front wheel and frame together.
Observe the wire color.
While the color-coding might slightly differ depending on the specific model of your Harley, the following general guide provides insights into standard color:
Black:
It often represents the ground wire. In most electrical systems, black or green wires indicate grounding.
Red:
This typically stands for power or the positive wire. In the context of tail lights, it may be associated with the brake light.
Blue:
They are sometimes used for the tail light or running light.
Yellow:
It is often related to turn signals. If there are two yellow wires, one may be for the left turn signal, and the other is for the right.
Brown:
Another color is sometimes used for running lights or the tail light.
Steps to Determine Tail Light Color:
Consult the Manual:
The best starting point is always the owner’s or service manual for your Harley-Davidson model.
It should have a detailed wiring diagram indicating the color codes used and their functions.
Visual Inspection:
Trace the wires from the tail light assembly back to their connection points. Identify the colors and where they lead.
Use a Multimeter:
If you’re unsure about the functionality of a particular wire, use a multimeter.
Set it to the DC voltage setting, connect the black probe to a good ground (like a metal frame), and touch the red probe to the wire in question with the motorcycle ignition in the ‘ON’ position.
If it’s a brake light wire, you’ll notice a change in voltage when the brake is applied.
Check for Wire Markings or Tags:
Sometimes, wires may have small tags or labels on them, indicating their function. This is especially true if aftermarket parts have been added.
Test with the Light On:
Turn on the motorcycle and observe the tail light. When you engage the brake, which wire shows voltage variation? This will help in confirming the brake light wire.
Recognize the color of the tail light positive wire.
Consult the Service Manual:
The most reliable method to determine the color of any wire on a motorcycle, including the tail light positive wire, is to consult the specific service manual for your Harley-Davidson model and year.
These manuals typically contain detailed wiring diagrams that indicate wire colors for various components.
Standard Colors for Tail Light Wires:
Over the years, Harley-Davidson has been relatively consistent with its wiring color codes. For many models:
- The blue wire often represents the tail light positively.
- The red wire is frequently the brake light positive.
- The black wire is generally the ground.
Note: This is a general guideline; deviations can occur based on the model and year.
Visual Inspection:
You can try to trace the wires from the tail light itself. Look for the wire leading directly to the tail light bulb’s central filament.
This is usually the positive wire for the tail light. Don’t confuse it with the brake light filament/wire if the two are integrated into a single unit.
Use a Multimeter or Test Light:
With the ignition switched on (but the engine off), you can use a multimeter or a 12V test light to identify the positive wire.
- Set your multimeter to the DC voltage.
- Connect the black probe to a known ground, like the frame or negative terminal of the battery.
- Use the red probe to test each wire leading to the tail light. The wire showing around 12V when the tail lights are turned on (but the brakes are not engaged) is your tail light positive.
Online Resources:
If you’re unsure about your findings, online Harley communities or forums can be valuable.
By providing your bike’s specific year and model, many experienced riders and mechanics might be able to help you.
Professional Assistance:
It’s always safest to seek guidance from a professional mechanic or an authorized Harley-Davidson dealership if in doubt.
Working with electrical systems can be tricky; one mistake can lead to more significant issues or potential hazards.
Cross-check the wires
Safety First:
Ensure the motorcycle is on a stable surface, preferably on a stand.
Disconnect the battery, then start with the negative terminal and the positive. This prevents accidental short circuits or electrical shocks.
Consult the Service Manual:
Every Harley model may have slight variations in wiring diagrams. Before starting, consult the service manual specific to your model to understand the wiring layout.
Visual Inspection:
Look for any visibly frayed, pinched, or damaged wires. Also, check for loose, disconnected, or out-of-place wires.
Check Wiring Connectors:
Loose or corroded connectors can lead to intermittent electrical problems. Ensure all connectors are clean, secure, and free of corrosion.
Use a Multimeter:
For a thorough cross-check, use a multimeter. This allows you to verify the continuity of each wire, ensuring there are no breaks inside the insulation that aren’t visible to the naked eye.
Check for proper voltage at various components, ensuring they receive power as specified in the service manual.
Verify Ground Connections:
A faulty ground can cause numerous electrical issues. Ensure that all ground connections are clean, secure, and make proper contact with the frame.
Check Routing:
Ensure wires are routed correctly, not pinched between components, and away from heat sources or moving parts. Incorrectly routed wires can wear out faster due to friction or heat.
Test Components:
Once you’ve verified the wiring, test individual electrical components (lights, ignition, horn, etc.) to ensure they function correctly.
Reconnect Battery:
After checking the wiring, reconnect the battery, starting with the positive terminal followed by the negative.
Test Ride:
After verifying and potentially correcting any wiring issues, take your Harley for a short test ride.
Monitor the bike’s performance and electrical functions to ensure everything works as expected.
FAQ
What color wire is tail lights?
Typically, the color wire for tail lights in many vehicles is brown. However, wiring colors can vary based on the vehicle’s make, model, and year.
It’s always best to consult the vehicle’s wiring diagram or manual.
What are the three wires to a tail light?
Tail lights in many vehicles come with three wires serving different functions:
Ground Wire (often black or white):
The wire completes the circuit and is connected to the vehicle’s chassis, providing a path for the current to return to the battery.
Tail Light Wire (often brown):
This wire powers the dimmer light that stays lit whenever the headlights or parking lights are on.
Brake/Turn Signal Wire (often red or yellow):
This wire powers the brighter light that activates when the brakes are pressed, or the turn signal is engaged.
Always check the vehicle’s manual or wiring diagram for specific wire colors and functions.
What color wire is the left tail light?
The color of the wire for the left tail light can vary based on the vehicle’s make and model. Typically, the left turn signal or brake light is often a yellow wire. However, for the tail light function itself, it might still be brown in many cases. Always consult the vehicle’s wiring diagram or manual, to be specific.
Wrapping Up
Usually, the color of the tail light on a Harley bike is solid blue once you have removed the passenger seat and identified the ground wire.
Then you can easily find the color for the tail light. It may be helpful if you need to replace or repair the wire with a new one.
You may replace the wire with your Harley bike’s little mechanical or electrical knowledge.
You may also love to read this:

Ahtsham Younas is a passionate blogger and content writer. He loves to ride motorcycles and learn the mechanical process behind the motorcycles.
He has been writing articles in the motorcycle industry since 2019 and has learned many things about motorbike niches.